
Force Byte
Printing Worksheets in Excel (4)
This time we will look at various settings in the "Header/Footer" tab of the "Page Setup" dialogue box.
Setting "Header/Footer"
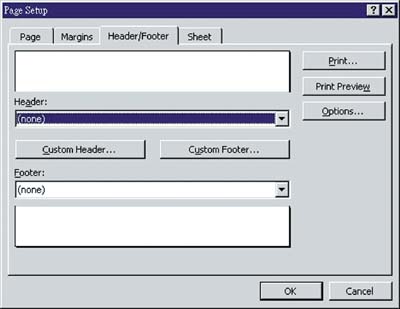
If you click the "Header/Footer" tab, you will see the following details in the "Page Setup" dialogue box.
The details in the dialogue box and their corresponding features are given below:
•Header
The default header is "(none)". In addition, the header will be placed automatically in the center section of the header zone based on the orientation of the paper. Besides, there is a "▼" button on the right of the header field. Press this and you will see a list of given headers. You can select one from the list directly if you do not want the sheet tab to be the header. To make further changes for the header, press the "Custom Header" button.
•"Custom Header" Button
To customise the content and format of the header, press this button and you will see the following dialogue box.
From the figure above, you will find that although the default header is positioned in the center section, you can move it to the left or right section. If you want to input your own header, you should move the insertion point to any designated position first before inputting words. Or you may use the following buttons to set the header.
If you press one of the above buttons, the corresponding header will appear in the insertion point. After that if you want to change the format of the header, you may first select the words of the header, and then press the "Font" button (
•Footer
The default footer is also "(none)" and will be placed in the center section of the footer zone based on the orientation of the paper. Moreover, there is a "▼" button on the right of the footer field. Press this and you will also see a list of given footers. You can select one from the list directly if you do not want the page number to be the footer. To make further changes for the footer, press the "Custom Footer" button.
•"Custom Footer" Button
To customise the content and format of the footer, press this button and you will see the following dialogue box.
Comparing the details of the above "Footer" dialogue box to those of the "Header" dialogue box, you will find that they are almost the same. The only difference is the display positions of the header and the footer. Therefore you can refer to the above explanation of the "Header" dialogue box to understand the details of the "Footer" dialogue box and their corresponding features.
Next time, I will talk about the "Chart" tab, which is the last tab in the "Page Setup" dialogue box.
(E-mail address: ITB_ForceByte_Editor@police.gov.hk)
![]()
![]() "Page"(
"Page"(![]() ): take the page number to be the header.
): take the page number to be the header.
![]() "Pages"(
"Pages"(![]() ): take the total number of pages to be the header.
): take the total number of pages to be the header.
![]() "Date"(
"Date"(![]() ): take the date of the current system to be the header.
): take the date of the current system to be the header.
![]() "Time"(
"Time"(![]() ): take the time of the current system to be the header.
): take the time of the current system to be the header.
![]() "File"(
"File"(![]() ): take the file name of the workbook to be the header.
): take the file name of the workbook to be the header.
![]() "Tab"(
"Tab"(![]() ): take the name of the sheet tab to be the header.
): take the name of the sheet tab to be the header.
![]() ). A "Font" dialogue box will appear for you to format the words of the header.
). A "Font" dialogue box will appear for you to format the words of the header.
![]()
"Sharing IT as it applies to your daily life."